


Transforming a simple sweet potato into multiple thriving plants requires nothing more than water, patience and a sunny windowsill. This propagation method offers gardeners an economical way to expand their vegetable patch whilst enjoying the satisfaction of nurturing new life from existing produce. The process centres on cultivating slips, the sprouted shoots that emerge from mature tubers, which unlike regular potatoes, serve as the primary means of sweet potato propagation. With minimal equipment and no financial outlay, this technique enables anyone to multiply their harvest year after year.
Preparing the Sweet Potato for Water Culture
Selecting a Suitable Sweet Potato
The foundation of successful water propagation begins with choosing the right tuber. Look for a firm, healthy sweet potato that shows no signs of rot, soft spots or extensive damage. Organic varieties often perform better as they have not been treated with sprout inhibitors that commercial growers sometimes apply. The size matters less than the condition, though medium-sized tubers typically produce a good balance of slips without overwhelming your growing space.
Inspecting for Viability
Before committing to the water culture process, examine your selected sweet potato carefully. Key indicators of a viable specimen include:
- smooth, unblemished skin with natural colouring
- absence of mould or fungal growth
- firm texture throughout the tuber
- small eyes or dormant buds visible on the surface
If your sweet potato has already begun sprouting in storage, this actually represents an ideal candidate as it demonstrates the tuber’s eagerness to grow. These early sprouts will develop more rapidly once placed in water.
Cleaning the Tuber
Gently wash the sweet potato under running water to remove soil, debris and potential contaminants. Avoid scrubbing too vigorously as this might damage the skin and create entry points for bacteria. Pat dry with a clean cloth and allow the tuber to air for approximately thirty minutes before proceeding to the next stage.
Once your sweet potato has been properly prepared and inspected, the next consideration involves finding an appropriate vessel to support the tuber throughout its growth journey.
Selecting the Right Container for Growth
Container Size and Shape
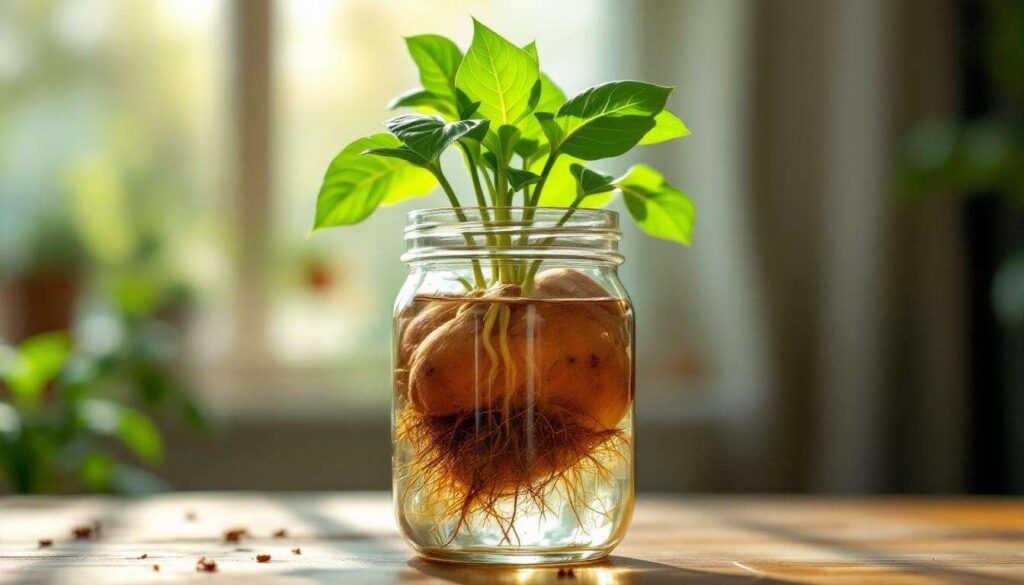
The vessel you choose must accommodate the sweet potato whilst allowing adequate water contact with the lower portion. Glass jars, wide-mouthed vases or shallow bowls all work effectively. The container should be wide enough to prevent the tuber from falling through whilst providing stability. A diameter of approximately 8-12 centimetres suits most medium-sized sweet potatoes perfectly.
Support Methods
Several techniques can suspend your sweet potato at the correct height:
- toothpicks inserted horizontally around the middle of the tuber
- specially designed plant supports available from garden centres
- narrow-necked bottles that naturally cradle the bottom half
- wire mesh cut to fit across the container opening
The toothpick method remains the most popular due to its simplicity and accessibility. Insert three to four toothpicks at equal intervals around the tuber’s circumference, angling them slightly downward to create a stable platform that rests on the container’s rim.
Material Considerations
Transparent containers offer the advantage of monitoring root development and water levels without disturbing the setup. However, opaque vessels can reduce algae growth in the water. Food-grade materials are essential as the sweet potato will be in constant contact with the container. Avoid metal vessels as they may react with the water and affect plant development.
With your container selected and support system in place, the actual positioning of the sweet potato in water requires attention to specific details that will determine your success.
Placing the Sweet Potato in Water: key Steps
Determining the Correct Orientation
Sweet potatoes have a pointed end and a rounded end. The rounded, wider base should face downward into the water as this is where roots will emerge. The pointed top, which naturally tapers, will produce the slips. If your tuber lacks obvious differentiation, examine it for small eyes or buds, which typically concentrate more heavily on the sprouting end.
Water Level Management
Fill your container so that approximately one-third to one-half of the sweet potato sits submerged. This proportion ensures sufficient moisture reaches the developing roots whilst keeping the sprouting portion above water to prevent rot. The water should be:
- room temperature to avoid shocking the tuber
- changed every three to five days to prevent stagnation
- topped up regularly as evaporation occurs
- free from chlorine if possible, so consider leaving tap water to stand overnight
Positioning for Success
Once suspended in water, place your container in a location that receives bright, indirect sunlight for most of the day. A south-facing windowsill works excellently in the UK. Avoid direct, intense sunlight which can overheat the water and encourage algae growth. Room temperature should remain relatively constant, ideally between 18-24°C, as fluctuations can slow development.
| Factor | Optimal Condition | Effect if Incorrect |
|---|---|---|
| Water depth | One-third to one-half submerged | Too much: rotting; too little: slow growth |
| Light exposure | Bright, indirect 6-8 hours daily | Insufficient: weak slips; excessive: algae |
| Temperature | 18-24°C | Cold: dormancy; hot: bacterial growth |
Having established the ideal environment for your sweet potato, patience becomes your primary tool as nature takes its course and sprouts begin to emerge.
Encouraging Sprout Development
Timeline Expectations
Initial sprout emergence typically occurs within one to two weeks of placing the sweet potato in water, though some tubers may take up to three weeks. Multiple slips will develop simultaneously from different points on the upper portion. These appear as small purple, green or reddish shoots that gradually elongate and develop leaves.
Optimising Growth Conditions
Several factors influence the speed and vigour of slip development. Maintaining consistent warmth accelerates growth, so consider placing your container on a heat mat if your home runs cool. Ensure the water remains fresh by changing it twice weekly, which provides oxygen to developing roots and prevents bacterial buildup that can inhibit growth.
Monitoring Progress
As slips develop, observe their characteristics:
- healthy slips display vibrant colouring and sturdy stems
- leaves should be well-formed without yellowing or browning
- growth should be steady, with noticeable development every few days
- roots will begin appearing from the submerged portion, often white and fibrous
Troubleshooting Common Issues
If slips fail to appear after three weeks, the tuber may be dormant or treated. Try gently scoring the skin in several places to stimulate growth. Cloudy water indicates bacterial growth and requires immediate changing. Slips that appear weak or spindly suggest insufficient light, necessitating relocation to a brighter spot.
Once your slips reach approximately 10-15 centimetres in length with several leaves, they become ready for the next phase of their journey into independent plants.
Transplanting the Young Shoots into Soil
Detaching the Slips
When slips achieve adequate size, carefully twist them from the mother tuber at their base. Each slip should come away cleanly with a small portion of the sweet potato attached. If resistance occurs, use a sharp, clean knife to cut the slip away. Aim to harvest slips that measure 10-15 centimetres with at least four to five leaves for best transplant success.
Optional Root Development Stage
Before planting in soil, many gardeners place detached slips in fresh water for an additional week to encourage root development. Submerge the bottom 2-3 centimetres in a small glass or jar, changing the water every two days. This step, whilst not essential, increases transplant survival rates as slips establish roots before facing the challenge of soil adaptation.
Preparing for Soil Planting
Timing proves crucial for outdoor transplanting. Sweet potatoes require warm soil temperatures of at least 15°C and no risk of frost. In the UK, this typically means late May or early June. Prepare your planting site by:
- choosing a sunny location with well-draining soil
- enriching the earth with compost or well-rotted manure
- creating ridges or mounds to improve drainage and warmth
- spacing planting holes 30-45 centimetres apart
The Planting Process
Dig holes deep enough to bury each slip up to its lowest leaves. Gently firm the soil around the stem and water thoroughly. For the first week, provide shade during the hottest part of the day to prevent transplant shock. Slips may appear wilted initially but should recover within three to five days as roots establish in their new environment.
With your slips successfully transitioned to soil, ongoing attention ensures they develop into productive plants that will eventually yield their own sweet potato harvest.
Maintaining and Caring for New Plants
Watering Requirements
Newly planted slips need consistent moisture without waterlogging. Water deeply two to three times weekly during dry spells, reducing frequency once plants establish after approximately three weeks. Sweet potatoes tolerate drought better than excessive moisture, which can cause root rot. A layer of mulch helps retain soil moisture whilst suppressing weeds.
Feeding and Nutrition
Sweet potatoes are relatively undemanding feeders. An initial application of balanced fertiliser at planting provides sufficient nutrients for early growth. Avoid high-nitrogen fertilisers which promote leafy growth at the expense of tuber development. A potassium-rich feed applied mid-season encourages robust root formation.
Ongoing Maintenance Tasks
Regular care activities include:
- checking for pest damage, particularly from slugs on young plants
- removing weeds that compete for nutrients and water
- monitoring vine growth and redirecting if necessary
- watching for signs of disease such as leaf discolouration
Harvesting Timeline
Sweet potatoes require approximately 12-16 weeks from planting to harvest, depending on variety and growing conditions. Tubers form underground as the season progresses. Harvest when foliage begins to yellow, typically before the first autumn frosts. Each plant can yield multiple tubers, which can then be stored or used to begin the propagation cycle anew.
This water propagation method transforms a single sweet potato into numerous productive plants without financial investment. By following these straightforward steps, gardeners gain not only an expanded harvest but also the satisfaction of sustainable, self-sufficient growing practices. The slips you nurture today become tomorrow’s crop, creating an ongoing cycle of growth that rewards patience and careful attention with abundant, home-grown produce.